Monday, March 26, 2012

DIY: Cheeky Bunny Ear HeadBand....

Bunny Ears are all the Rage!!! Seen on the runway and High Fashion Mags for Spring...

Simply done craft for hip chic, trendy mommy and children of all ages....

why not create this cheeky accessory for your next easter get together...

And why not BEAD-DAZZLE your guests!!!!

THESE BUNNY EARS ARE EVERY WHERE  :)
Even for the Bedroom....  ;)

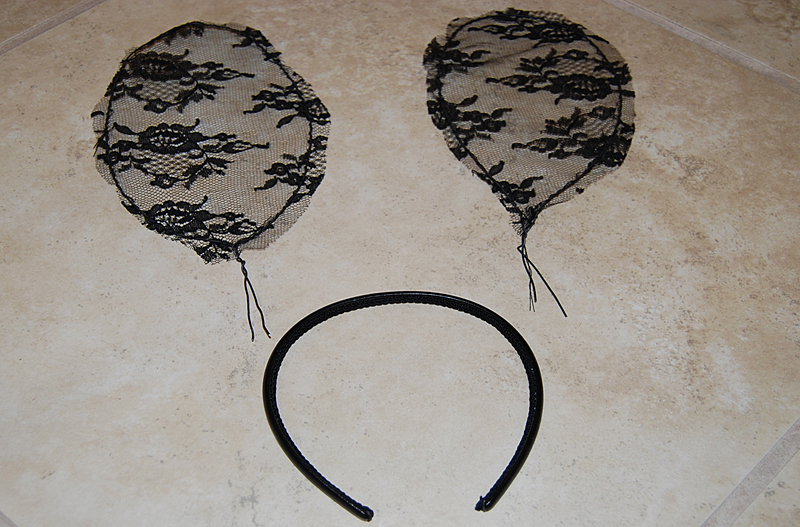
Quick way to craft Lace Bunny Ears:

Black Head Band
Black Lace
Wire or Black Pipe Cleaner

HOT GLUE LACE TO WIRE ATTACH WIRE TO HEAD BAND

VIOLA!
WRAP DIFFERENT COLOR RIBBON AROUND WIRE FOR EXTRA FLARE!!!!

Play it by Ear

By Country Living


Step 1: Cut an 181⁄2- inch-long piece of bias tape. Hem the cut ends under 1⁄2 inch on each side, then stitch together the long side to form a casing. Fold the casing in half so that the ends touch and use a straight pin to mark the fold’s center.

Step 2: Feed an extra-thick, 12-inch-long pipe cleaner through one end of the casing, stopping at the pin. Feed a second pipe cleaner through the casing’s other end until it, too, meets the pin; remove pin. Bring the casing’s open ends toward each other and twist the exposed pipe cleaners together to form a rabbit ear shape. Repeat steps one and two to make a second ear.

Step 3: Cut a piece of bias tape the length of the headband, plus one extra inch. Wrap the tape over the headband, then use pins to mark the two spots where you want to attach the ears (use the photo at left for guidance).

Step 4: Remove the tape from the headband and stitch the long side together, from the pins out to both ends of the tape; stitch these ends closed, and remove pins. Twist the ears’ pipe-cleaner ends around the headband in the desired spots, then slide each end of the headband into the casing. Use a needle and thread to slip-stitch the tape around and between the ears closed.


Enjoy, Happy Easter!!
Missy B.

Sunday, March 25, 2012

Spring In Bloom: Flower and Wreath Baby Head Band


My Baby Girl Chloe born March 8,  2012
wearing DIY : Sun Burst Head Band

My Sleeping Beauty wearing DIY: Wreath of White Poppies

Dear Followers,

I am sorry I have not gotten the chance to post new simple crafts for your enjoyment. I delivered my baby girl Chloe Alexa on March 8th and have been consumed by her beauty and love!

I decorated her last week with flowers by crafting two different designed headbands using 1/2 inch elastic, an artificial flower (sun burst), white paper flowers (white poppies), and hot glue!

***(You can find cheap flowers at your local dollar store, Paper Flowers are found at ACMoore or Micheals Crafts in the scrap booking aisle.)

These designs are very simply done. You measure the elastic by the circumference of your baby's head and add 1 inch. Simply hot glue the flowers directly to the elastic, creating any pattern you choose. (I liked a large white poppy in the middle with smaller poppies on the side for my wreath headband.)

Once the flowers are glued securely you then hot glue the elastic on either end ( 1/2 inch on either side) to close the band and create a tiny headband for your baby!

Now you are ready to take beautiful pictures of your lovie and send out greeting cards wishing your family and friends a very Happy Spring!!!!!

Enjoy!

Missy B.

Tuesday, March 6, 2012

Decorate your Cutie and Yourself with Shamrocks!

Here's a quick craft for St. Patty's Day. Decorate your little cutie with green felt shamrocks. Create pins, hairband ties, and headbands by cutting out green felt and hot glueing them to whatever you have laying around the house...


This green felt cut out was simply hot glued together using two different sized shamrock cut outs,  and a green button. Once dried simply hot glue the back of the felt shamrock to a bobby pin and VIOLA! A simple statement for your hair this St. Patty's Day!


Use the template below as a pattern. Adjust size when printing to fit your need; smaller shamrocks for hairpins or clips or larger in size for a headband accesorry. Have fun!

Saturday, March 3, 2012

Peter Pan Collar Necklace Tutorial


Hope you enjoyed this DIY Scissors, Fabric, Glue Tutorial!
Have a great weekend.
Missy B.


Free Pattern Download: Click on Image and Print


Friday, March 2, 2012

Spring Trend: DIY Collar Necklace

So in love with these peter pan collar necklaces that are on trend for this Spring! I've collected some for the craft vault, and plan to knock off this weekend. All you need is Scissors,. Fabric, Glue!
Oh yeah, and maybe  a few fun sequins, glitter, and ribbon ;)


Glitter!!!

Printed Fabric

Silver Sequins

Pearls

Beaded Applique
Animal Print...Grrrr

Stay tuned for the DIY Collar Necklace Tutorial post tomorrow with Free Pattern...